

Water cooling is a popular method of cooling computer components, especially high-performance components such as CPUs and GPUs.
Using liquid to cool your PC hardware is more effective than air cooling because water has a higher thermal conductivity and can absorb more heat than air.
This is why an increasing number of PC enthusiasts are using water cooling solutions to cool their CPUs and GPUs, and in so doing, get the following benefits:
- improved hardware performance
- more silent PC operation
- chips enabled to tackle overclocking tasks more easily
- prolonged lifespan of PC components
- improved workflow and/or gaming experience
This guide will show you how to build your own GPU water cooling kit. But before we do that, let’s quickly tackle the basics of how water cooling works.
A Brief Overview of How Water Cooling Works
Water cooling loops use a liquid, typically water mixed with a coolant solution, to transfer heat away from components in a computer or other electronic device. The water is pumped through a closed loop system, passing through a radiator or heat exchanger to dissipate the heat before returning to the components to absorb more heat.
What Components Do I Need for My GPU Water Cooling Kit
The beauty of making your own watercooling kit, aside from the boost in performance, is that you can create your own custom loop system. You can build loops that are unique and optimized according to your own needs and desires, especially in terms of budget, aesthetics, available space in your PC case, the GPU you have, etc.
Now, building a water cooling loop with your own GPU water cooling kit will require a certain set of water cooling parts so your system can function correctly and in an optimal manner.
These typically include:
Radiators – they move heat away from your PC hardware.
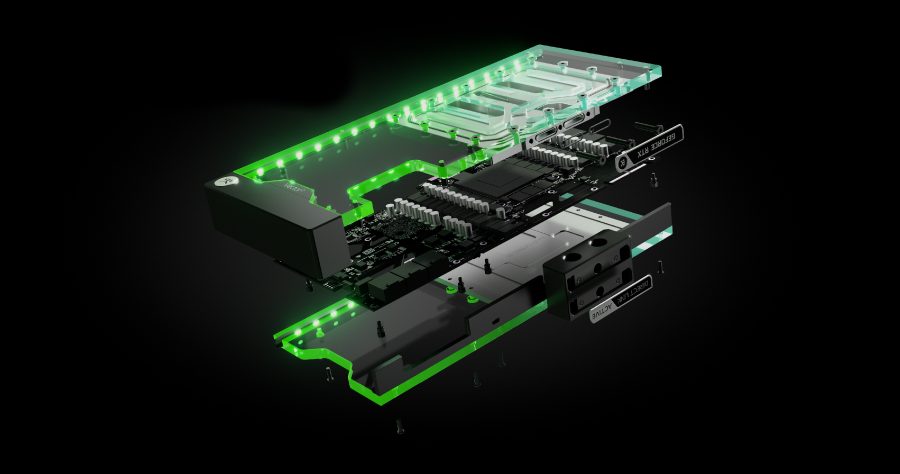
Water Blocks – much like active heatsinks, water blocks are placed on your PC component (in this case, a GPU) in order to transfer the heat generated in the chip to a radiator.
Reservoir – holds the water/coolant before it is released into the loop. In some cases, the reservoir is combined with other watercooling kit parts.
Pump – is the component that pushes the coolant through the loop.
Fans – they dissipate heat.
Tubes and Fittings – these are used to create the watercooling loop itself and connect everything together.
Coolant – the liquid that flows through the tubes and moves the heat away from the components.
Pro Tip:
Since there has been an influx in watercooling options, it is highly recommended that you get all the correct parts for your GPU water cooling or your CPU water cooling kit. The best way to do this is to use the Watercooling Compatibility Tool, which will help you find the optimal parts for your custom loop. Make sure you get the correct water block for your GPU, find the suitable tubes and fittings, use an appropriate radiator, etc. Using the Custom Loop Configurator is also extremely handy when building your loop, especially if you are more of a novice than an expert in PC water cooling.
Assembling and Installing Your GPU Water Cooling Kit
Once you have all the required components for your GPU water cooling kit, it’s time to lay them all out to properly prepare your loop and have a clear overview of the system. If everything checks out, the installation process may begin.
Step 1: Prepare the GPU
The first step in building a GPU watercooling kit is to remove the GPU from your computer. This can usually be done by removing the screws from the IO bracket, unclipping the PCI-e slot, and gently lifting the GPU out of the PCIe slot. Be sure to handle the GPU carefully, as it is a delicate component.
If, however, you have a brand-new GPU that hasn’t already been installed inside your PC, congrats – you’ve already completed the first step.
Step 2: Install the GPU Water Block
Once the GPU is out of the computer, you can install the GPU water block. The water block will have a base that sits on top of the GPU and a backplate that goes over the GPU. To install the water block, remove the cover and apply a thin layer of thermal paste to the GPU. Then, carefully place the water block base on top of the GPU and secure it with the screws provided.
Step 3: Install the Radiator
The next step is to install the radiator. This can be done by attaching the radiator to the space dedicated to fans/radiators inside the PC case using the provided screws. The radiator must be connected to the GPU water block using tubing and fittings.
Step 4: Tubing and Fittings
Connect your radiator, GPU water block, and all other components in your water cooling loop with the right tubing and fittings. Finding the correct parts for your build shouldn’t be a problem at all, but with a plethora of options to choose from, we suggest watching this video to get a general idea of where to start.
Step 5: The Water Pump
The water pump is responsible for moving the water through the system. It can be placed anywhere in the loop, so you can put it where you think it is optimal for your build. It, too, should be connected to the radiator using tubing and fittings.
Step 6: Install the Reservoir
The reservoir is used to hold the coolant and can be placed anywhere in the system as long as it is connected to the water pump and radiator with tubing and fittings. You can also opt for the pump-reservoir combo unit, if that is a better solution for your needs.
Step 7: Install the Fans
Fans cool the radiator and should be mounted either to the front or the back of the radiator. They should be attached to the radiator using the provided screws and should be oriented in such a way that they push the air out of the PC case.
Step 8: Add the Coolant
Once all the components are in place, you can add the coolant to the system. Be sure to use a high-quality coolant that is designed for use in water cooling systems. You can add the coolant to the reservoir and turn on the water pump to circulate the coolant through the system.
Also, don’t forget to test your GPU water block and your entire loop for potential leaks, which can be easily performed with this nifty leak tester tool.
Step 9: Power On and Test
Finally, connect the power supply to the water pump and turn on the computer. Monitor the system for leaks and check the GPU’s temperature to ensure it is being cooled properly.
Important tip: Always read through the instructions for each connected piece to ensure you’re putting them all on as the manufacturer intended.
Summing Up
Building your GPU watercooling kit can be a challenging but rewarding experience. By following this guide, you should be able to build a watercooling system that effectively cools your GPU and improves your computer’s performance. Remember to handle the components carefully and monitor the system for leaks.


